SEC595: Applied Data Science and AI/Machine Learning for Cybersecurity Professionals


Experience SANS training through course previews.
Learn MoreLet us help.
Contact usBecome a member for instant access to our free resources.
Sign UpWe're here to help.
Contact Us
Over the years, being able to examine filesystem timeline data has truly been a breakthrough for many investigations. We started using this technique when we were working on cases in the AFOSI very early on when I wrote a script that would create a basic timeline called mac_daddy.pl based off of the original coroner's toolkit. To my surprise, this key forensic capability that is found in the TCT tools, sleuthkit, and others has not been picked up on by the major forensic vendors as a capability in their toolsets such as EnCase and FTK.
Today's post will discuss how to create a windows operating system timeline of both filesystem and registry data using the SIFT Workstation.
Timeline analysis essentially takes the metadata time values for each existing and unallocated metadata structure in the file system and sorts it, in order from earliest to most recent, to be viewed and interpreted by a forensic analyst. A good portion of Day 2 in the SEC508 Computer Forensic, Investigation, and Response class is dedicated to creating and analyzing timeline data for both Windows and Linux machines.
Timeline Data is based off of the timestamps stored in the metadata of your filesystem. Lets take a look at the different timestamps stored for some of the most common filesystems you might encounter.

Once a timeline is created, it will be sorted based off of the above timestamp data into a file. Each line will have an output that will include the majority of the metadata associated with it. Learning how to interpret a timeline takes time and practice, but after you utilize it for several cases you will realize just how valuable this data will be to help generate additional computer forensic leads to examine inside the case you are working.

You will need the SIFT Workstation for this example.
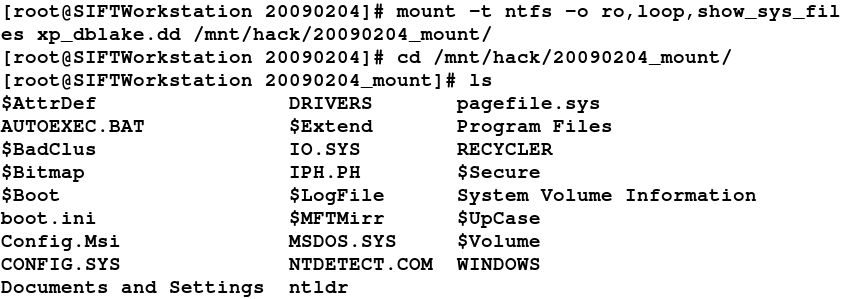
Not only can you bring in timeline data from the filesystem, the registry can also be combined into a timeline. First of all we will start with a filesystem image that was acquired. This is our working copy image that is in raw (dd) format. In this case, the name of the file is xp_dblake.dd acquired in the 20090204 case following the YYYYMMDD case name example.

Mounting an image is easy. Take a look at the previous Digital Forensic SIFT'ing blog on how to examine and mount raw (dd) images in read-only mode.

Regtime.pl is a tool that was created by Harlan Carvey and can be found on the SIFT Workstation to parse the registry and pull all of the last write times from every key. It will output in the sleuthkit "bodyfile" format that can be added to the filesystem bodyfile or analyzed separately using the mactime tool. I had been bugging Harlan for years for this capability based off of his knowledge of the registry. He probably knows registry forensics better than anyone I know and his toolkits show it.
How do you use regtime.pl? Easy.
Run from /usr/local/src/windows-perl on the SIFT Workstation
# perl regtime.pl —m <HIVETYPE> —r <HIVEFILE> > bodyfile
[Useful Options]
-r Registry hive file to parse <HIVEFILE>
-m Name of <HIVENAME> for Mactime Bodyfile
Example (HKLM-SAM, HKEY-USER-NAME)
The benefits of identifying when specific keys are last updated and comparing that to what is occurring on the filesystem is a very telling investigative technique. You can use this to easily identify when files are saved, USB keys are inserted, and programs are executed.
Creating a timeline of the registry is easy. You just need to remember where the registry hives are stored on the windows filesystem. The program will require you to point the (-r) option at the specific registry hive you would like to parse. Remember, HKEY_LOCAL_MACHINE hives are located in C:\WINDOWS\system32\config (SECURITY, SAM, system, software). The HKEY-USER hives are located in C:\Documents and Setting\<username>\NTUSER.DAT. If you are one of the few people using VISTA look in C:\Users\<username>NTUSER.DAT.
The hive name is utilized by the mactime program to allow for the user to easily identify the specific key and the hivetype that it originated from. Without the (-m) option, you will not know which user a specific hive originated from. The (-m) option will take any regular input.
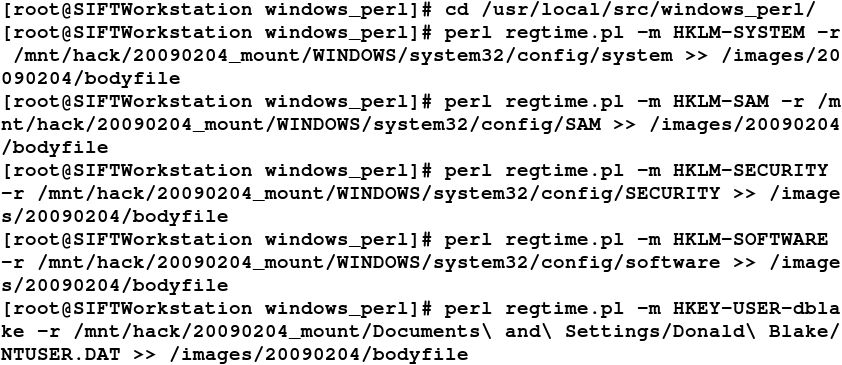
The output below uses the mounted filesystem above and uses regtime.pl. This is an example of using regtime.pl to pull bodyfile data from the core HKEY_LOCAL_MACHINE hives (system, SAM, SECURITY, software) located in /WINDOWS/system32/config/ directory. Notice how in each execution it is appending to the existing bodyfile using the (>>) as a part of the command. Each of the 4 core hives and the user hive (NTUSER.dat) will be added to the overall bodyfile located in this example in /images/20090204/bodyfile.

Once the bodyfile has been created, then we can move on to adding the metadata timestamps from the NTFS filesystem using fls from the sleuthkit. Again, make sure you continue to use the (>>) to append the existing bodyfile. Finally, once our final bodyfile is created we can use the mactime tool to create our human readable output for examination.


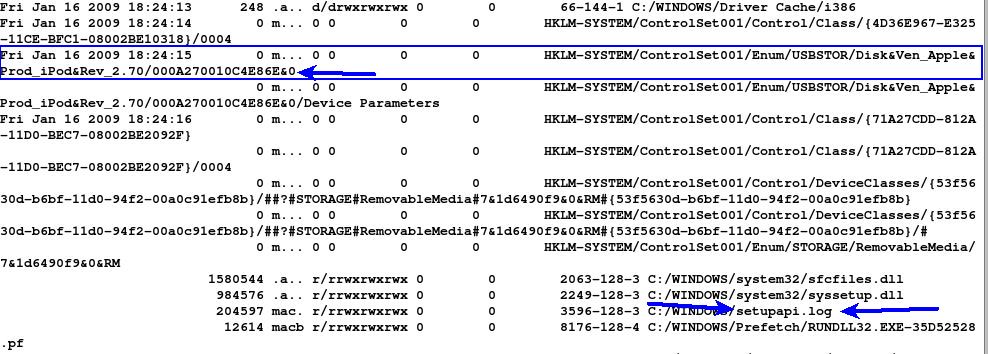
In the above example we can see exactly where the setupapi.log file was updated which is very useful in forensics. On VISTA the location of this file is \WINDOWS\inf\setupapi.dev.log. You can also clearly see when the HKEY_Local_Machine USBSTOR keys were last modified when the Apple Ipod was inserted. Again detailed information on USB History viewing and their associated registry keys can be found in many places.
The overall point of this exercise is to show you how to create a timeline of both registry and file system data. This combination makes a very powerful analysis mechanism for examining changes to the system around a specific time of activity on a machine.


Rob T. Lee is Chief AI Officer and Chief of Research at SANS Institute, where he leads research, mentors faculty, and helps cybersecurity teams and executive leaders prepare for AI and emerging threats.
Read more about Rob T. Lee