SEC595: Applied Data Science and AI/Machine Learning for Cybersecurity Professionals
SEC595Cyber Defense, Artificial Intelligence

Developed by Eric Zimmerman, the EZ Tools suite is a collection of utilities written to assist with multiple aspects of forensic analysis.

I recently had to install the EZ Tools suite natively on a Linux virtual machine and found it more challenging than expected. Traditionally designed for Windows, these tools can be compiled and run natively on Linux due to the cross-platform nature of .NET. This guide covers everything from setting up the required .NET environment, getting the tools, and testing the installation.
Developed by Eric Zimmerman, the EZ Tools suite is a collection of utilities written to assist with multiple aspects of forensic analysis. Some of the key tools include:
These tools can run natively on Windows as well, but in cases where you tend to or end up using a Linux system, it can be useful to have the same capability across platforms.
Before you begin, ensure your Linux workstation meets the following requirements:
Since the EZ Tools are built on the .NET framework, you’ll need to install the appropriate .NET runtime on your Linux workstation. The following steps outline the process for Ubuntu, but the process is similar for other distributions.
# Update the package index and install prerequisites (if necessary)
analyst@forensics:~$ sudo apt update
analyst@forensics:~$ sudo apt install -y wget apt-transport-https software-properties-common
# Install .NET9 (change --channel if you'd prefer a different version)
analyst@forensics:~$ wget https://builds.dotnet.microsoft.com/dotnet/scripts/v1/dotnet-install.sh -O /tmp/dotnet-install.sh
analyst@forensics:~$ chmod +x /tmp/dotnet-install.sh
analyst@forensics:~$ /tmp/dotnet-install.sh --channel 9.0
analyst@forensics:~$ rm -r /tmp/dotnet-install.sh
You'll likely need to prepare an alias for dotnet to ensure it'll run appropriately with a clean command-line:
# Create the alias and reload your shell configuration
analyst@forensics:~$ alias dotnet='~/.dotnet/dotnet'
analyst@forensics:~$ source ~/.bashrc
# Test the alias
analyst@forensics:~$ dotnet
Usage: dotnet [options]
Usage: dotnet [path-to-application]
Options:
-h|--help Display help.
--info Display .NET information.
--list-sdks Display the installed SDKs.
--list-runtimes Display the installed runtimes.
path-to-application:
The path to an application .dll file to execute.
At this point you've successfully installed .NET on your system.
Now that your .NET environment is ready, download the EZ Tools. I tend to install them under /opt/. If you prefer a different setup, create that folder structure now. Then, download and unzip the relevant tools:
# Download the tool, unzip to /opt/, then remove the archive
# If you used a different .NET version, make sure to update the tool URL
analyst@forensics:~$ wget https://download.ericzimmermanstools.com/net9/MFTECmd.zip -O /tmp/MFTECmd.zip
analyst@forensics:~$ sudo unzip /tmp/MFTECmd.zip -d /opt/MFTEcmd
analyst@forensics:~$ rm -r /tmp/MFTECmd.zip
# Add an alias to make running the tool a simple command
analyst@forensics:~$ alias mftecmd='dotnet /opt/MFTEcmd/MFTECmd.dll'
analyst@forensics:~$ source ~/.bashrc
This sample syntax will work for MFTECmd. The relevant links/URLs for Eric's other tools are available here: https://ericzimmerman.github.io/#!index.md.
Note: The folder structure within the archives and the capitalization is sometimes different depending on which tool you download, e.g., the C in Cmd above. Double-check both when downloading and extracting each archive, and when creating your aliases.
With your EZ Tools now installed and configured, you can test them. Run each alias you created with -h to determine if the tool is working as expected:
analyst@forensics:~$ mftecmd -h
Description:
MFTECmd version 1.3.0.0
Author: Eric Zimmerman (saericzimmerman@gmail.com)
https://github.com/EricZimmerman/MFTECmd
Examples: MFTECmd.exe -f "C:\Temp\SomeMFT" --csv "c:\temp\out" --csvf MyOutputFile.csv
MFTECmd.exe -f "C:\Temp\SomeMFT" --csv "c:\temp\out"
MFTECmd.exe -f "C:\Temp\SomeMFT" --json "c:\temp\jsonout"
MFTECmd.exe -f "C:\Temp\SomeMFT" --body "c:\temp\bout" --bdl c
MFTECmd.exe -f "C:\Temp\SomeMFT" --de 5-5
--snip--
Usage:
MFTECmd [options]
--snip--
Grab a copy of a $MFT, either from your machine, a VM, or some other NTFS formatted drive. If you’re working with a disk image (e.g., an E01), use your forensic tools to extract or mount the relevant artefacts. Then, run MFTECmd, pointing it at the relevant file, specifying CSV output in a known location:
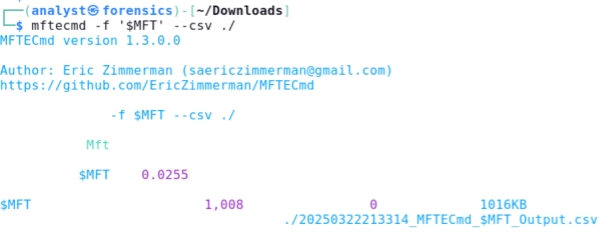
Note: Use quotes around $MFT to prevent the shell from treating it as a variable.
Review the output file to ensure the tool works as expected. If you receive an error, it is probably the result of typos, so check your aliases. Once the tool is working, follow the same process for the other EZ Tools you require. For reference, one way to quickly check the output is to print the first 10 rows to the terminal, cutting on the comma (given it's a comma-separated dataset), showing a few specific fields of interest, then translating those commas to tab characters:
analyst@forensics:~$ head -10 20250322213314_MFTECmd_\$MFT_Output.csv | cut -d',' -f 1-2,7,9,12-14,17 | tr ',' '\t'
https://images.contentstack.io/v3/assets/blt36c2e63521272fdc/bltc687607ab356514a/680690059a3191445d63fd62/EZTools002.pngEric provides a PowerShell script, Get-ZimmermanTools.ps1, so downloading and keeping his tools up to date is as easy as possible. That's great for a Windows environment, where PowerShell is everywhere, but that's not always the case with Linux. Luckily for us, PowerShell is now also cross-platform, so we can install it on our Linux system. What follows are instructions for installing PowerShell under Linux on ARM architecture; Microsoft has documentation on doing the same on Intel.
# Pull down the latest version from
# https://github.com/PowerShell/PowerShell/releases/
analyst@forensics:~$ wget https://github.com/PowerShell/PowerShell/releases/download/v7.5.0/powershell-7.5.0-linux-arm64.tar.gz -O /tmp/powershell.tar.gz
# Install it into /opt/
analyst@forensics:~$ sudo mkdir -p /opt/powershell/
analyst@forensics:~$ sudo tar zxf /tmp/powershell.tar.gz -C /opt/powershell/
analyst@forensics:~$ sudo chmod +x /opt/powershell/pwsh
analyst@forensics:~$ rm -r /tmp/powershell.tar.gz
# Add an alias for clean cmdlines, then enter the PowerShell terminal
analyst@forensics:~$ alias pwsh='/opt/powershell/pwsh'
analyst@forensics:~$ source ~/.bashrc
analyst@forensics:~$ pwsh
PowerShell 7.5.0
PS>
Next, get Eric's script, unzip it, and run it in pwsh:
PS> wget https://download.ericzimmermanstools.com/Get-ZimmermanTools.zip -O /tmp/Get-ZimmermanTools.zip
PS> unzip /tmp/Get-ZimmermanTools.zip -d /opt/
PS> rm /tmp/Get-ZimmermanTools.zip
PS> /opt/Get-ZimmermanTools.ps1 -Dest /opt/ -NetVersion 9
When the script completes, you'll have a new net9 folder (net6 by default) in the -Dest location you specified. From there, you can create aliases for each of the tools like we did earlier. Additionally, run the script again to get the latest updates to EZ Tools. It'll check the !!!RemoteFileDetails.csv and download any tools that have been updated since the last run of the script.
The entire process—installing .NET, downloading EZ Tools, and configuring aliases-can be automated. I’ve posted a complete script with error checking to ensure everything goes smoothly and provide details on what failed if necessary, on my GitHub.
EZ Tools, the Linux Way Running EZ Tools natively on Linux provides a streamlined, efficient environment for forensic investigations. This approach integrates better with native Linux workflows.
You’re now equipped to leverage the full power of EZ Tools in a Linux environment.
References: