Introduction to Shadow Timelines
This past weekend I was upgrading the SIFT Workstation to the new version and I realized I had not used the Windows version of the Sleuthkit tools in awhile. I usually demonstrate in class that many of the sleuthkit tools can work directly against the logical partitions of a Physical Hard Drive (e.g. \.\C:, \.\D:). It occurred to me that I had never tried to use the filesystem parser and timeline generator fls on a Windows Vista, Windows 7, or Windows 2008 Server ShadowCopyVolume. Note, for some odd reason I have had difficulty getting fls to work on a x64 based systems. Some sleuthkit commands work while others do not. Odd.
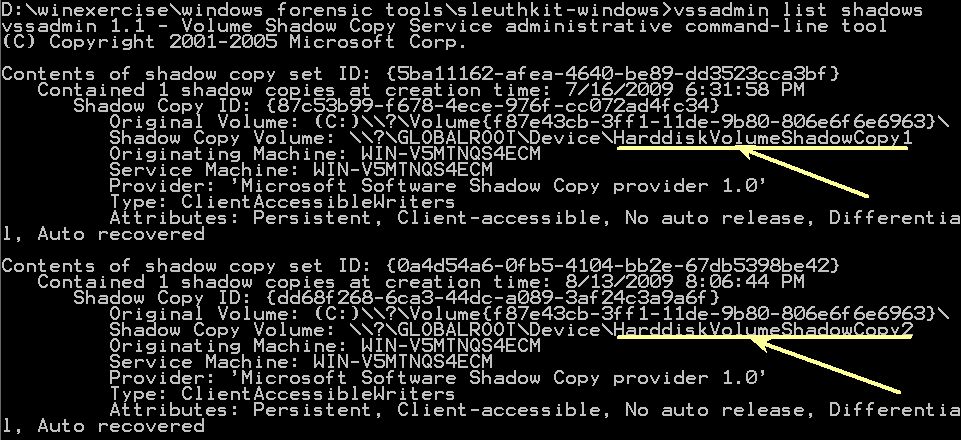
We have known for some time now that you can image a Shadow Volume. I wrote a post back in 2008 describing it titled VISTA and Windows 7 Shadow Volume Forensics. We found out you could use dd.exe to carve a logical volume at \.\C: We also found out we could use the same command to point at a ShadowCopy called \.\HarddiskVolumeShadowCopy#. However, after that entire year, I never once attempted to run any of the sleuthkit tools against the logical volume of a shadow copy volume.
Sleuthkit Shadow Forensics
The potential for full forensics could be significant. However, with everything else, I always begin with the timeline to see if the basics would work. It did. Here is what I found out.
Starting with the CDROM I created in the Forensics 508: Advanced Computer Forensic Analysis and Incident Response, I launched an administrator enabled command prompt in the sleuthkit-windows directory from my CDROM. Again, I want to mimic that someone might want to run this during incident response. You can easily convert a dd image into a VMDK using liveview and load into a Windows 7 workstation virtual machine in non-persistent mode if you want to examine shadow volumes from a raw/dd image as well.
Extract Current Filesystem Data
We start with the command to extract our current filesystem data and send it across the network to our waiting SIFT Workstation 2.0.

Extract Shadow Filesystem Data


D:\winexercise\windows forensic tools\sleuthkit-windows> fls -r -m Shadow2 \.\HarddiskVolumeShadowCopy2 >> \SIFTWORKSTATION\cases\ShadowTime\bodyfile

Creating the Timeline
Switch over to your SIFT Workstation and run mactime. I usually run it with the comma-delimited format so I can view it in excel.
sansforensics@SIFT-Workstation:/cases/ShadowTime$ mactime -d -b bodyfile > shadow_timeline.csv
One thing I immediately noticed was that with all three times that are the same you will have three seperate entires. However, you are also able to pinpoint which shadow file your data might reside in. Let us take a look at the timeline of the SAM hive alone without any other files.

This might create too much data. One option to consider is to compile all the data into one directory listing using C:\ across each VolumeShadow. I re-ran the shadow timeline tools and created a single timeline without an identifier where the data might reside (e.g. Shadow1 or Shadow2). Viewing is much less of a headache via this method, but it is up to the investigator to choose which way might work best.
Once you have created the single file, you need to sort it and pull out any overlapping entries by using simple commands on the SIFT Workstation.
And after running mactime a 2nd time, I recieved output a little easier for an examiners head to interpret. In this version, you can tell each time the file was last modified or accessed over the lifetime of the ShadowCopies. Notice you only obtain one creation time instead of three. However, you cannot tell which of the ShadowCopyVolumes might contain the data you are looking for.

Conclusion
Analysis of Shadow Volumes is now possible without having to image the entire volume first using the sleuthkit tools on a live windows machine.
Some additional Sleuthkit commands that are very interesting:
List all deleted files from a volume now:
D:\winexercise\windows forensic tools\sleuthkit-windows> fls -rpd \.\C: >> \SIFTWORKSTATION\cases\deleted_files_now.txt
List all deleted files from a volume then:
D:\winexercise\windows forensic tools\sleuthkit-windows> fls -rpd \.\HarddiskVolumeShadowCopy1 >> \SIFTWORKSTATION\cases\deleted_files.txt
Notice the different filesizes.... very nice.

Extract Unallocated Space from the volume for today:
D:\winexercise\windows forensic tools\sleuthkit-windows> blkls \.\C: >> \SIFTWORKSTATION\cases\c-drive-TODAY.unallocated-space
Extract Unallocated Space from the volume for 7-16-2009 (HarddiskVolumeShadowCopy1)
D:\winexercise\windows forensic tools\sleuthkit-windows> blkls \.\HarddiskVolumeShadowCopy1 >> \SIFTWORKSTATION\cases\c-drive-7-16-2009.unallocated-space
There are some very cool implications here. If you find something interesting yourself, please let us know. For more information on ShadowVolume Forensics consider attending Digital Forensics Courses with us here at the SANS Institute.
Rob Lee has over 13 years experience in computer forensics, vulnerability discovery, intrusion detection and incident response. Rob is the lead course author and faculty fellow for the computer forensic courses at the SANS Institute and lead author for FOR408 Computer Forensic Essentials and FOR508 Computer Forensics Investigations and Incident Response.


