SEC595: Applied Data Science and AI/Machine Learning for Cybersecurity Professionals


Experience SANS training through course previews.
Learn MoreLet us help.
Contact usBecome a member for instant access to our free resources.
Sign UpWe're here to help.
Contact UsSiftgrab was developed to assist individuals of any experience level in identifying and correlating forensic artifacts.

One of the most comprehensive resources for introducing newcomers to Digital Forensics and Incident Response (DFIR) is the SANS Windows Forensic Analysis Poster. Because Microsoft continues to hold the largest operating system market share, it makes sense to start with Windows forensics. It’s also widely acknowledged that Windows servers and endpoints are prime targets for attackers, which supports the rationale for learning Windows forensics. The problem for new analysts is that the intricacies of Windows and the sheer number of Windows forensic artifacts can quickly become overwhelming. The SANS poster nicely specifies Windows artifacts and correlates their presence with different types of activity.
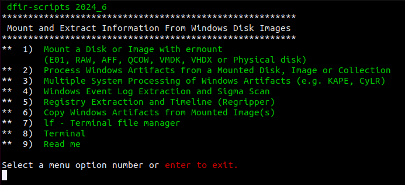
Along those same lines, Siftgrab was created to extract artifacts from Windows systems into categories that are easy to identify. Siftgrab runs as a Linux shell script menu that serves as a wrapper for many useful open-source forensic tools and custom scripts. The most common method for extracting artifacts is to mount a disk image (Figure 1, Menu Item 1) and process the image file (Figure 1, Menu Item 2). Similarly, artifact collectors like Kape and CyLR can also be processed by setting the source directly to the root drive of an uncompressed acquisition (Figure 1, Menu Item 2). Additionally, multiple system acquisitions can be processed when they are uncompressed in a single directory and listed by acquisition name (Figure 1, Menu Item 3).

To install Siftgrab on the SANS SIFT, run the following commands from a terminal window:
sudo docker pull dfirscripts/siftgrab:latestsudo docker run -it -v /mnt:/mnt -v /cases:/cases dfirscripts/siftgrabNote: You can also run Siftgrab outside of Docker by running a separate install script on a fresh virtual machine (VM) installation of Ubuntu, Kali, or Windows WSL.
Docker is great because it provides an isolated environment in which applications can operate regardless of any host operating system dependencies. Since the Siftgrab Docker terminal window is isolated, volume mappings are required to access data outside of the container. For that reason, evidence should be mounted or otherwise made accessible before loading the Siftgrab Docker container. One easy way to mount disk images and VMDKs is by using the ermount script that is part of Siftgrab. You can install it on your host with the following command:
sudo wget -O /usr/local/bin/ermount https://raw.githubusercontent.com/dfir-scripts/EverReady-Disk-Mount/master/ermount.sh && sudo chmod 755 /usr/local/bin/ermountFrom here mounting is a breeze, regardless of image format. Just run ermount and follow the prompts.
To unmount and start again, just enter:
ermount -u(For this example we will be using the practice image from the excellent lab exercise, “The Case of the Stolen Szechuan Sauce.”
https://images.contentstack.io/v3/assets/blt36c2e63521272fdc/blt6fac4a0c2f789721/66bb8dc4af0978c8b7a824d7/siftgrab003.pngOnce you have a mounted image to process you can load and run Siftgrab from Docker with a single command. The menu appears and you can begin processing.
(The use of “-v” is used to create volume mappings between Siftgrab and the SANS SIFT VM.)
sudo docker run -it -v /mnt:/mnt -v /cases:/cases dfirscripts/siftgrabSiftgrab uses input prompts like ermount, allowing you to process Windows artifacts and save them to your designated case folder with just a few keystrokes. The ability to mount and process data, whether locally or via network shares, depends on your lab setup and available bandwidth. Several factors influence processing time, including the type, number, and size of artifacts. For instance, processing the image example on my humble four-year-old desktop, running VMware, took only 2 minutes and 15 seconds.
https://images.contentstack.io/v3/assets/blt36c2e63521272fdc/blta380fe9db4078387/66bb8dc4eb9a52153e75d667/siftgrab005.pngOnce finished, Siftgrab displays a notification indicating the completion of the process, along with details such as the output size, location, and processing time. Once you return to the main menu, you can repeat the process on another image or directly access additional tools included with Siftgrab (see Figure 4, Menu Item 8). A comprehensive list of these tools is available here.
Note: Menu options “4” and “5” are already included in Menu option “2,” so there is no need for additional processing.
https://images.contentstack.io/v3/assets/blt36c2e63521272fdc/blt91d562afce373a62/66bb8dc4eae58fea5ec005c0/siftgrab006.pngBecause the data output is a mix of text, csv, and json, they are grep and jq friendly. Regripper 3.0 is leveraged for registry parsing so other timeline outputs are converted and written to TLN timelines and converted to csv resulting in a “Triage-Timeline.”
There are several other useful outputs that fall outside of the timeline category including:
Siftgrab is an ongoing project and the subject of a SANS Gold Paper written attempting to identify and corral Windows artifacts into an acquisition and processing script using SANS SIFT. Over the years it has been updated and adapted into what it is today.
Much like the Windows Forensic Poster, Siftgrab was developed to assist individuals of any experience level in identifying and correlating forensic artifacts. By integrating open-source tools and generating organized outputs, Siftgrab aims to simplify access to an array of Windows artifacts. The GitHub repository and comprehensive list of tools used in Siftgrab can be found here.


John currently lives in United Arab Emirates serving as a technical advisor and SME in the area of cyber defense. He has spent most of the last 20 years researching, reporting, and defending against cyber-attacks.
Read more about John Brown