SEC595: Applied Data Science and AI/Machine Learning for Cybersecurity Professionals


Experience SANS training through course previews.
Learn MoreLet us help.
Contact usBecome a member for instant access to our free resources.
Sign UpWe're here to help.
Contact UsGuest Editor: Today's post is from Taras Kholopkin. Taras is a Solutions Architect at SoftServe, Inc. In this post, Taras will take a look at the authentication and authorization security features built into the ASP.NET MVC framework.
Implementing authentication and authorization mechanisms into a web application with a powerful ASP.NET Identity system has become a trivial task. The ASP.NET system was originally created to satisfy membership requirements, covering Forms Authentication with a SQL Server database for user names, passwords and profile data. It now includes a more substantial range of web application data storage options.
One of the advantages of the ASP.NET system is its two-folded usage: it may be either added to an existing project or configured during the creation of an application. ASP.NET Identity libraries are available through NuGet Packages, so they may be added to existing project via NuGet Package Manager by simply searching for Microsoft ASP.NET Identity.
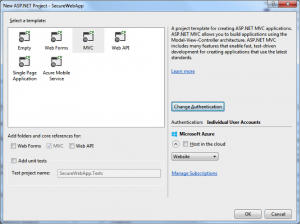
Configuration during creation of an ASP.NET project is easy. Here's an example:

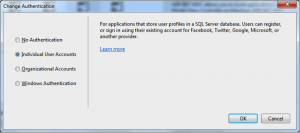
In Visual Studio 2013, all the authentication options are available on the "New Project" screen. Simply select the ?Change Authentication' button, and you are presented with the following options: Individual User Accounts, Organizational Accounts, or Windows Authentication. The detailed description of each authentication type can be found here.

In this case, we opt for ?Individual User Accounts.' With ?Individual User Accounts,' the default behavior of ASP.NET Identity provides local user registration by creating a username and password, or by signing in with social network providers such as Google+, Facebook, Twitter, or their Microsoft account. The default data storage for user profiles in ASP.NET Identity is a SQL Server database, but can also be configured for MySQL, Azure, MongoDB, and many more.
The auto-generated project files contain several class that handle authentication for the application:
App_Start/Startup.Auth.cs — Contains the authentication configuration setup during bootstrap of ASP.NET MVC application. See the following ConfigureAuth snippet:
public void ConfigureAuth(IAppBuilder app)
{
   // Configure the db context, user manager and signin manager to use a single
   //instance per request
   app.CreatePerOwinContext(ApplicationDbContext.Create);
   app.CreatePerOwinContext(ApplicationUserManager.Create);
   app.CreatePerOwinContext(ApplicationSignInManager.Create);

   // Enable the application to use a cookie to store information for the signed
   // in user and to use a cookie to temporarily store information about a user
   // logging in with a third party login provider
   // Configure the sign in cookie
   app.UseCookieAuthentication(new CookieAuthenticationOptions
   {
      AuthenticationType = DefaultAuthenticationTypes.ApplicationCookie,
      LoginPath = new PathString("/Account/Login"),
      Provider = new CookieAuthenticationProvider
      {
         // Enables the application to validate the security stamp when the user
         // logs in. This is a security feature which is used when you change
         // a password or add an external login to your account.
         OnValidateIdentity = SecurityStampValidator.OnValidateIdentity(
            validateInterval: TimeSpan.FromMinutes(30),
            regenerateIdentity: (manager, user) =>
               user.GenerateUserIdentityAsync(manager))
      }
   });

   app.UseExternalSignInCookie(DefaultAuthenticationTypes.ExternalCookie);

   // Enables the application to temporarily store user information when they are
   // verifying the second factor in the two-factor authentication process.
   app.UseTwoFactorSignInCookie(DefaultAuthenticationTypes.TwoFactorCookie
      , TimeSpan.FromMinutes(5));

   // Enables the application to remember the second login verification factor such
   // as phone or email.
   // Once you check this option, your second step of verification during the login
   // process will be remembered on the device where you logged in from.
   // This is similar to the RememberMe option when you log in.
   app.UseTwoFactorRememberBrowserCookie(DefaultAuthenticationTypes.TwoFactorRememberBrowserCookie);

   // Enable login in with third party login providers
   app.UseTwitterAuthentication(
      consumerKey: "[Never hard-code this]",
      consumerSecret: "[Never hard-code this]");
}
A few things in this class are very important to the authentication process:
Additional details regarding configuration of authentication can be found here.
App_Start/IdentityConfig.cs — Configuring and extending ASP.NET Identity:
ApplicationUserManager - This class extends UserManager from ASP.NET Identity. In the Create snippet below, password construction rules, account lockout settings, and two-factor messages are configured:
public class ApplicationUserManager : UserManager
{
   public static ApplicationUserManager Create(IdentityFactoryOptions options, IOwinContext context)
   {
      var manager = new ApplicationUserManager(new UserStore(context.Get()));
      // Configure validation logic for usernames
      manager.UserValidator = new UserValidator(manager)
      {
         AllowOnlyAlphanumericUserNames = false,
         RequireUniqueEmail = true
      };

      // Configure validation logic for passwords
      manager.PasswordValidator = new PasswordValidator
      {
         RequiredLength = 6,
         RequireNonLetterOrDigit = true,
         RequireDigit = true,
         RequireLowercase = true,
         RequireUppercase = true,
      };

      // Configure user lockout defaults
      manager.UserLockoutEnabledByDefault = true;
      manager.DefaultAccountLockoutTimeSpan = TimeSpan.FromMinutes(5);
      manager.MaxFailedAccessAttemptsBeforeLockout = 5;

      // Register two factor authentication providers. This application uses Phone
      // and Emails as a step of receiving a code for verifying the user
      // You can write your own provider and plug it in here.
      manager.RegisterTwoFactorProvider("Phone Code", new PhoneNumberTokenProvider
      {
         MessageFormat = "Your security code is {0}"
      });

      manager.RegisterTwoFactorProvider("Email Code", new EmailTokenProvider
      {
         Subject = "Security Code",
         BodyFormat = "Your security code is {0}"
      });
      manager.EmailService = new EmailService();
      manager.SmsService = new SmsService();
      var dataProtectionProvider = options.DataProtectionProvider;
      if (dataProtectionProvider != null)
      {
         manager.UserTokenProvider =
            new DataProtectorTokenProvider(dataProtectionProvider.Create("ASP.NET Identity"));
      }
      return manager;
   }
}
You'll notice a few important authentication settings in this class:
Models/IdentityModels.cs — This class defines the User Identity that is used in authentication and stored to the database (ApplicationUser extends IdentityUser from ASP.NET Identity). The "default" database schema provided by ASP.NET Identity is limited of the box. It is generated by the EntityFramework with CodeFirst approach during the first launch of the web application. More information on how the ApplicationUser class can be extended with new fields can be found here.
public class ApplicationUser : IdentityUser
{
   //Add custom user properties here

   public async Task GenerateUserIdentityAsync(UserManager manager)
   {
      // Note the authenticationType must match the one defined in CookieAuthenticationOptions.AuthenticationType
      var userIdentity = await manager.CreateIdentityAsync(this, DefaultAuthenticationTypes.ApplicationCookie);

      // Add custom user claims here
      return userIdentity;
   }
}
Controllers/AccountController.cs — Finally, we get to the class that is actually using the configuration for performing registration and authentication. The initial implementation of login is shown below:
// POST: /Account/Login
[HttpPost]
[AllowAnonymous]
[ValidateAntiForgeryToken]
public async Task Login(LoginViewModel model, string returnUrl)
{
   if (!ModelState.IsValid)
   {
   return View(model);
   }

   var result = await SignInManager.PasswordSignInAsync(model.Email
      , model.Password, model.RememberMe, shouldLockout: false);
   switch (result)
   {
      case SignInStatus.Success:
         return RedirectToLocal(returnUrl);
      case SignInStatus.LockedOut:
         return View("Lockout");
      case SignInStatus.RequiresVerification:
         return RedirectToAction("SendCode", new { ReturnUrl = returnUrl
            , RememberMe = model.RememberMe });
      case SignInStatus.Failure:
         default:
      ModelState.AddModelError("", "Invalid login attempt.");
      return View(model);
   }
}
It is important to realize that the Login action sets the shouldLockout parameter to false by default. This means that account lockout is disabled, and vulnerable to brute force password attacks out of the box. Make sure you modify this code and set shouldLockout to true if your application requires the lockout feature.
Looking at the code above, we can see that the social login functionality and two-factor authentication is automatically handled by ASP.NET Identity and does not require additional code.
Having created an account, proceed with setting up your authorization rules. The authorize attribute ensures that the identity of a User operating with a particular resource is known and is not anonymous.
[Authorize]
public class HomeController : Controller
{
   public ActionResult Index()
   {
      return View();
   }

   [Authorize(Roles="Admin")]
   public ActionResult About()
   {
      ViewBag.Message = "Your application description page.";
      return View();
   }

   public ActionResult Contact()
   {
      ViewBag.Message = "Your contact page.";
      return View();
   }
}
Adding Authorize attribute to HomeController class guarantees authenticated access to all the actions in the controller. Role-based authorization is done by adding the authorize attribute with the Roles parameter. The example above shows the Roles="Admin" on the About() action, meaning that access to the About() action can be performed only by an authorized User that has the role of Admin.
To learn more about securing your .NET applications with ASP.NET Identity, sign up for DEV544: Secure Coding in .NET!
Taras Kholopkin is a Solutions Architect at SoftServe, and a frequent contributor to the SoftServe United blog. Taras has worked more than nine years in the industry, including extensive experience within the US IT Market. He is responsible for software architectural design and development of Enterprise and SaaS Solutions (including Healthcare Solutions).