The following is a simple introduction to starting Helix Live for Windows.
In the event that the CD autorun features is enabled, a Helix license Window should appear. If autorun is disabled, you can run Helix by double clicking on the helix.exe file on the CD. Newer versions of Helix are available, but the process is basically the same.
The Helix Live function is used to collect volatile data (evidence) and in cases where the system cannot be shutdown. Whenever you work on a live system, you need to ensure that you take care to minimize any changes to the system. Changes always occur on live systems. Just letting a system run creates change.
Now accept the Terms of Use. The default language that Helix will use via the drop-down box is English. French and German are also available. To use Helix, read the agreement and then press "I Agree" to continue. Once the terms have been accepted, the main screen will appear (See figure 1).
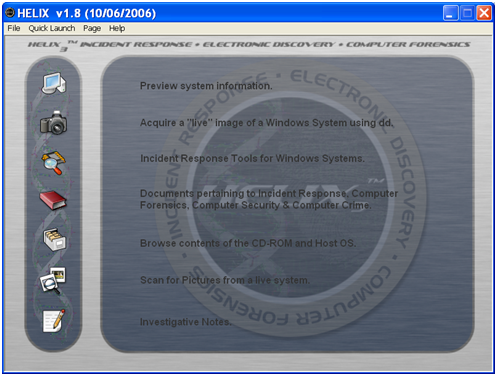
After Helix's main screen appears, select any of the options by clicking on the associated icons (see Figure 2). The Helix Main screen doesn't behave as a standard window. Helix does not show up in the taskbar, and it is not possible to <ALT><TAB> to it. Helix places an icon in the system tray, which can be used to access the program (see Figure 3).
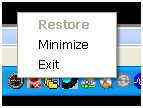
By double-clicking or right-clicking on the icon and selecting "Restore", the main Helix window is brought to the front of the window. Other options on the right-click menu include Minimize and Exit.
The main screen provides access to three main examination options in Windows:
- Preview System Information This option displays the basic information of the system. Information obtained includes the Operating system version, network information, owner information, and a summary of the drives on the system. There is also a second page that will show a list of running processes.
- Acquire a "live" image of a Windows System using dd This enables the imaging of hard drives, floppy disks, or memory, and allows storing them on local removable media, or over a network.
- Incident Response tools for Windows Systems There are a large number of tools (including the Windows Forensic Toolkit) that can be run directly from the CDROM. On clicking this icon, a small triangle will appear (see Figure 4).
Clicking on the triangle gives access to the other tools pages.
Explore all the following pages and try the tools:
- Documents pertaining to Incident Response, Computer Forensics, Computer Security & Computer Crime This option accesses a number of reference documents in PDF format. These documents include a chain of custody form, preservation of digital evidence information, Forensic examination for digital evidence guide, and Linux forensics Guide for beginners. These documents are a great introduction in how to conduct a forensic examination.
- Browse contents of the CD-ROM and Host OS This option takes the user to a file browser that provides basic information about the selected files. It displays the filename, (created, accessed and modified) dates, file attributes, CRC, MD5 and file size.
- Scan for Pictures from a live system This option accesses a tool that can scan the system to find any suspect graphic images. Many different graphic formats are recognized, and these are displayed as thumbnails.
- Investigative Notes This is a small notepad to make notes while working on the system
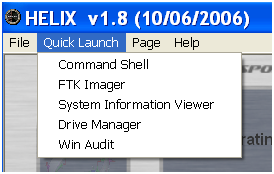
Helix's Quick Launch option provides access to a number of tools. Try them all and become familiar with their use (see Figure 5).
It is important to note, the first time a file is selected on a live system; Helix will display the access date of the last access. If the same file is selected again, it will show the date and time of the preceding access. This is due to the nature of the Windows operating system. It cannot be prevented while in Live Mode (This is not an issue when booting into Linux Mode). When examining a live system remember that your actions may modify the system.This is due to the nature of live acquisitions. A live system will use a R/W (Read/Write) drive. This is necessary as the operating system has to write to the drive when it is being used. For this reason, you need to take care. Once all of the volatile data has been obtained and an image has been taken of the drive, the changes are less of an issue, but still should be minimized.
Craig Wright is a Director with Information Defense in Australia. He holds both the GSE-Malware and GSE-Compliance certifications from GIAC. He is a perpetual student with numerous post graduate degrees including an LLM specializing in international commercial law and ecommerce law as well as working on his 4th IT focused Masters degree (Masters in System Development) from Charles Stuart University where he is helping to launch a Masters degree in digital forensics. He starts his second doctorate, a PhD on the quantification of information system risk at CSU in April this year.


.png)
